Updated: December 29, 2001

Home Page3-Wheelers4-WheelersMagazinesRide InfoCrash & BurnLinksDumb Stuff About Me

YAMAHA WRENCH REPORT: 1985 Yam Tri-Z


Both phases of the Yamaha Wrench Report deal with engine mods. Starting off the exhaust port should be raised 1.5mm.

An additional boost port is added to the right side of the cylinder. Use caution in drilling so that the ports do not break into the cylinder stud holes-the results are major-league air leak time and a blown engine.

PHASE I:
THE CYLINDER

All of the work done to the cylinder should be done by someone who's knowledgeable about two-stroke motors. The porting required is rather simple, but if it's done by the wrong person, the results could be catastrophic. You wouldn't want your Tri-Z to run like a blender, so take the time to find a savvy grinder. First, grind 1.5mm from the top of the exhaust port. The top of the port should measure 36.5mm from the top of the cylinder. Once it's ground, all the edges must be smoothed and contoured, with no abrupt changes in the shape of the port. All sharp edges or protrusions should be chamfered along the port edges.

With a hand drill and porting tool, duplicate the boost port (intake, sub-inlet port) on the right side of the cylinder. Both boost ports should be enlarged to 12mm wide and 24mm high. Make sure that the base of the holes matches the edge of the base gasket surface. Use caution in drilling so that the ports do not break into the cylinder stud holes-the results are major-league air leak time and a blown engine.

CYLINDER HEAD
The next step requires precise machining. Using a lathe or milling machine, cut approximately 0.5mm from the gasket surface of the head. With the head installed, the cranking pressure must be between 170 psi and 175 psi with the engine cold. Machining the head increases the compression and is critical to the Wrench Report gains in performance. There should be a minimum of 0.75mm of clearance between the piston and the head. If this squish band is less, you'll need to recut the head to meet the requirements.

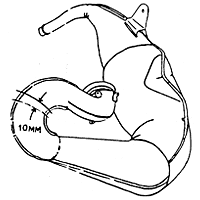
10mm is cut out of the standard exhaust pipe. The cut should be right at the
U-shaped section that bulges as the header section leaves the cylinder.


10mm is cut out of the standard exhaust pipe. The cut should be right at the
U-shaped section that bulges as the header section leaves the cylinder.

EXHAUST PIPE
Next, a section of the header pipe on the exhaust system must be cut out. Take a hacksaw and slice out a 10mm section from the right side of the pipe while it's on the bike. The cut should be right at the U-shaped section that bulges as the header section leaves the cylinder. Tack weld the pipe together, then remove it from the machine and complete the weld. Again, use extreme caution, and preferably, have an expert do the welding.

AIR FILTER
If water, mud and extreme dust are not factors, the stock air filter and intake system can get trashed. The high breather system stifles the air intake and hampers the power of the Tri-Z.

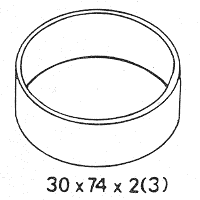
This intricate design is replaced by a K&N filter, #RC2000. If you look closely, it's the same filter used on Harley choppers. If you run this filter, the tool kit and coolant reservoir get the ax. Also, a section of the rear fender must be chopped away to allow room for the K&N unit. Leave the stock intake boot on the carb. An adapter must be made to connect the new filter to the carb boot. Check the photos to get the idea; it should measure 30mm long with a 74mm O.D. and be 2mm to 3mm thick.

REEDS, CARB AND MUFFLER
Take the stock reeds off and replace them with Boyesen fiber reeds. Only a small carburetion change is needed; change the main jet from a 470 to a 490. Last on the list is the silencer and spark arrester. Chuck the stock model and pop on an Answer Products unit.

That's it for Phase I of the Yamaha Wrench Report. A little later we'll get into how the Tri-Z performs with the mods.